Monday, December 19, 2016

Chevron Side Table

I'd like to share a furniture transformation.  This spunky colored side table was a great find because it featured a magazine rack down below.

Before: 

This cute little piece had a very heavy coat of glossy black paint.  I spent many hours sanding it down to wood.  I was willing to put some time in, since it only cost me $3.


With it well sanded, I went straight to painting.  Very rarely do I prime my furniture.  Especially since I do sanding after for the distressed look.

After:


It looks plain from the side, but it has a fun little paint job down below.


I used a paper homemade stencil for those chevrons.  They took this little table from drab to fab!


I did a light coat of paint and sanded the edges.  As you can see this old table had some nail holes showing & even a minor crack.  But I managed to sell this little darlin' at an occasional sale for $40.

Linking up to:
Between Naps on the Porch
http://betweennapsontheporch.net/classic-winter-clothing-sale/


Saturday, July 2, 2016

Patriotic


It's now the holiday weekend!


My home has a few patriotic
items on display as a reminder of
our great nation.


I encourage my children to read the Declaration
of Independence!  It sits out for all to see.

The little Cracker Jack ships look cute on it.


I found a way to display my vintage
48 star flag!  It looks great by my
dad's military frame.


Stay safe this extra long weekend &
have a great time with friends and family.

Friday, June 24, 2016

Bread Box

I'd like to share with you my most recent
paint project.  This was a major rescue!

We've all seen them, the classic old wood
bread box...

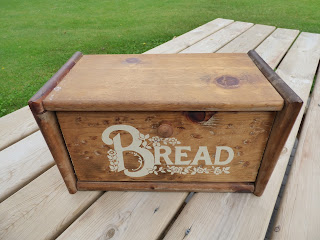
I paid one whole dollar for it.

These small paint projects are my
favorite.  The small items sell better
in my craft booth too.


I painted the box ivory & used my Cricut
die cut machine to make some harlequin
pattern adhesive vinyl stencils.
I never get sick of this pattern, it is sharp & stylish.


My advice to others with this type of project
is to SAND THE WORD down before painting.
If you look very close in real life,
you can see it.  Most people might not notice.
It depends how picky you are!


Now do think someone will really use it
for storing bread???


Linking up to:


Sunday, June 12, 2016

Pig Barn Windows

My mom delivered a whole stack of weathered
old windows from her pig barn in Iowa.
They had just put new windows in so the
building could be used for storage.
Many of the old ones had no glass or
only half of their original glass.

I decided to put some patriotic fabric
in a few for some festive wall art.


I cut some cardboard for my background.
It's a light weight way to hold the fabric on flat.


Next I had to pick two different fabrics that
looked cute next to each other.


I sewed the two together and hid
the seam under the middle window board.


The printed words & flag lines were hard to
get straight. 

My second window is the best.
The bold color contrast & simple
prints went together just right.


I am excited that summer is here & things are
lush and green.  The holiday will be here before
we know it.  Lets show a little pride for the Fourth.


~Jane

Linking up to:


Friday, May 6, 2016

Mirrors

I love old mirrors.
They were so fancy back in the old days.
Often times you'll find them, separated from their
matching dresser or vanity.

Here are a few of my recently
painted old mirrors.


BEFORE


AFTER


BEFORE


AFTER


Here is a close up of the
lovely details....


A light sanding on the decoration & edges 
gives it some real vintage pizazz!
The worn mirror glass patina is so dreamy.
I love that aged look, even if it may be seen
as imperfection by some.


The details on the first mirror are more delicate
and the mirror is perfectly clear.


These are both will work great in 
almost any home.  Ivory is the most
versatile and safe (to sell) tone.  But some folks love 
a good POP of a bold color.

BEFORE


AFTER


Hello turquoise!

This one, unlike the wooden mirrors,
is molded plastic.  It still has great details.


Thanks for stopping by my blog!
Have a great Mother's Day weekend.


Linking up to:

Saturday, April 2, 2016

Junk Bonanza Fall 2015

Well, the spring Junk Bonanza in Minnesota
is less than a month away.
I plan to attend this year, with some friends.

It got me thinking about my experience
last fall as a vendor!  I'd like to share some
pictures of my items and display.


I sold a mix of greeting cards, created junk & of
course smalls & antiques.

I rented only a table space this round,
since my first time selling with a full
sized booth was so overwhelming!

This AMAZING fan sold.


This goose grate was from an old screen door.
It was a unique item & sold the first day!


The mum bucket & thermos found new homes as well.


The pouring tea pot is still available on my
Etsy shop: MinnesotaJunker
Just in time or "garden season"!


I had one in my garden hanging from
a Shepard's hook over tall phlox 
and it looked amazing.


I changed up my display each day at the show.
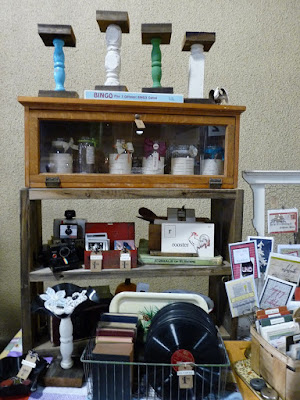
Both glass cabinets sold.


I sold the Hopalong Cassidy wallet box (inside the cabinet). 
 The old door knobs went like hot cakes, especially the glass ones.


You can still find some of the large flashcards
and shabby wood pedestals on my Etsy shop too.


Those darling old stroller wheels sold.
That chunky paintbrush is in my Esty shop.

The best part of the whole experience was 
the table next door.  She gave me some good
insight into her marketing.  Call me crazy,
but I even bought a petticoat from her.
She had wonderful scarves, mittens 
and slippers made from old sweaters.

The second best part of being a vendor
was getting to do a walk through each
morning before the show opened.

Saturday, March 26, 2016

Fancy Book

I snatch up old books, even if they're in
a different language.  Why?  Well, I find
some of the fancy page decorations
too beautiful to keep hidden away!


With major conditions issues,
this book was a lost cause.
I didn't have any regret salvaging
out the pages for making cards.


With a little erasing,
 I was able to save part of this page.


This is a collection of the pages
with fancy flourish designs.

Although I can think of many uses,
here is one of the cards I made....


The stamps I used are Unity brand.
There is a strip of Smash brand tape
along the bottom.  Take a closer look
at the sentiment with sparkles...


I use Distress ink around my paper edges to 
try and match the aged paper tones.

I am in the mood for spring,
and my crafts are starting to show it!

Have a great Easter.

Linking up to:
Funky_Junk's_Party_Junk_link_party_150


Saturday, March 19, 2016

Painted Frames

I have been absent from my blog for a while.
The return to my seasonal job has me
trying to find a balance in life.
It's an adjustment every year.

My new favorite project is painting empty frames. 
 I've been purging my stockpile of them 
& giving them each a face lift.
I've painted them all the same 
color ivory & distressed the edges.


You know the look. It's a cute jumbled mess
of frames, usually on a mantle.
I think you could pull this off on top
of any dresser or buffet.

BEFORE:


This kind of project takes up my kitchen table
for a few days!  It drives the family nuts!
But the truth is, they are selling as fast as
I can whip them out!


The very chunky one above was $1.50 at
a thrift store.  I got three like that. 


I plan to stock up at garage sales this summer.
Then you can often get frames for .50 to $1,
and maybe even free!


This pair above was already ivory.
I paid one dollar each. 


They had some chips & a nice crackle.


This large frame was a total rescue.
It had a very bad corner, which I 
had to reconstruct.  The pattern on it was
so pretty, I couldn't just toss this old frame.


It looks crude, but it already sold!
We'll just say THAT frame had character.

I bought two with a curvy edge.
Those little frames were only .10 each!


I hope I've inspired you to get out
that idle can of ivory paint!

Linking up to: