Tuesday, December 22, 2015

Free Windows

This was the year of free old windows.
Word has spread that I make various 
things from the chippy old panes.
My shed rafters are busting with
the stockpile!  It's been a while since
I made some wall art windows.
Here is my latest creation:


I love this quote & think it 
speaks to a lot of other people!

My handy dandy book called 
THE INSPIRATION STATION
is loaded with phrases, quotes & titles
for scrapbookers & cardmakers.
I use it to dream up new projects 
all the time.

I used my Cricut machine to cut
the adhesive vinyl letters & 
"eyeballed" them on!

Linking up to:


Holiday DIY party


Friday, December 18, 2015

More Arrow Signs!

I'm loving all the more
natural trends right now.
They call it "woodland" style.

As an avid outdoors lover,
decorating with arrows & antlers 
comes very easily!


The "happy" signs have gone well 
at my craft booth.

Here are a few of the holiday 
signs I made...


Linking up to:


AND


Rooted In Thyme


Tuesday, December 1, 2015

Fancy Desk

Hi folks.
I'm excited to share a cool desk transformation
with you.  I forgot to get a "before" picture.
But as you can imagine, it was your typical 
dark brown wooden desk. 

Here is the updated piece...


This was a ready to paint, sturdy desk.
It had minimal varnish & since I planned on
distressing the edges, I did no sanding at all!
I chose not to prime either.
In my opinion,
skipping these steps should 
only happen if you: 
Use Annie Sloan Paint
or
Plan on a very distressed look
Clean well with TSP
Apply a super thin base layer
Give the first layer ample dry time


It had great hardware,
which can make or break 
your furniture sale.
These were intricate, 
fine & had a great patina!


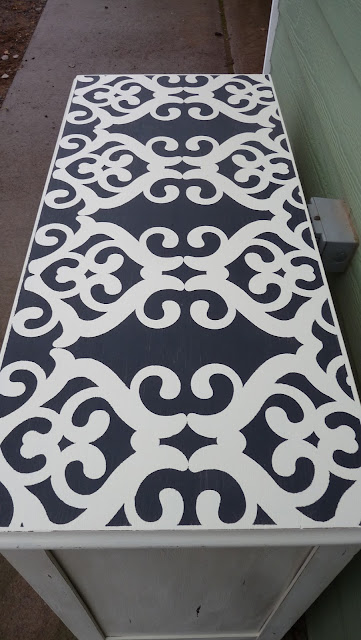
The top got a fancy stencil design.
I made it using my Cricut machine & 
adhesive vinyl.


It's a messy, tedious process.  But in the 
end it is very much worth the time.
I've gotten pretty fast at it!
Sometimes choosing the design can be tricky.


For creative stencils,
the biggest trick is to
make sure your base layers of paint
are good & dry.  Otherwise, when you pull 
your tape & stencils off the paint will 
peel right off with it.
I don't apply much pressure to the
tape either.  


Now the honest breakdown...

paint brand: Valspar

desk cost: $5

selling price: $80

After cleaning,
 3 coats of paint,
stencil time,
& distress sanding:
about 3-4 hours of work

Now, I am already moving 
on to my next project!

Linking up to:
and


Wednesday, November 18, 2015

DIY Ornament Tree

Check out this creative use for old Christmas
 ornaments on Pinterest.   Crate & Barrel Knock-off

I tried my own version of this craft.
Some items used are reclaimed cedar wood,
Shiny Brite ornaments, embossed tin
 & salvaged wire.


How great would this be for an apartment
that lacked room for a full sized tree?


The tones of these glass balls are 
gold, silver & green.  It's a neutral look.


Here is an example of using whatever"junk" you have!
This spool was rescued from the woods,
as was the old embossed tin building edging.


So, which TREE do you like better???


Thanks for stopping by!

You can find more inspiring projects
at these blog parties...

Linking up to:


and


Friday, November 6, 2015

Pedestals

I had a large stockpile of wood spindles. 
Many were from a friend that was moving.


 So, one day I painted all
kinds of them.  When lightly sanded
and paired up with weathered wood,
they look pretty cute.


The copper one sold first.
This would make a great candy dish.
Copper works great for fall.

I love the plain wooden ones.
They look festive with a
pumpkin on top.


Linking up to:


&


Wednesday, October 28, 2015

Annie Sloan Caddy

I'm still pecking away at using up my
Annie Sloan Olive paint.
The stuff seriously NEVER goes bad!
 
I found an ugly, glossy blonde
wood caddy at a garage sale.
Just look how cute it is now,
as part of my fall décor....
 
 
That dark wax gives the illusion
of year of use.
I like the dark A.S. colors because
you can get away with skipping the
clear wax step.
It can save you some money,
if you haven't gotten into stockpiling her
brand of paint products.
 
 
I often wonder if these style totes
are made for hauling paint cans.
Quart cans fit mighty well.
 
The beauty of this type is that it's deep
enough to stand on either end.
You could hang it as a wall shelf too!
 
 
This mellow green is the perfect
addition to the fall color palette.
It goes great with orange, red, yellow
and pale blue.
 
You could easily switch it out
for Christmas color items in a few months.
I love that army green color,
it's very natural & versatile.
You should consider adding it to
YOUR color palette.
 
 
Linking up to:
My Show and Share Party 


Monday, October 12, 2015

Rustic Fall Signs

My friend gave me the BEST old wood
from the hot tub they tore out.
 
It was weathered, but solid.
Plus, it smelled like heaven
every time I cut the cedar.
 
 
If you follow my blog,
you'll know that I use my
Cricut machine to cut
adhesive vinyl words & shapes.
They make good stencils for
nice crisp signs.


The happy signs are a huge seller.
I can't make them fast enough!
 
 
This sign would look cute on a wall by
framed photos of your children!
 
 
You could hang a couples photo or wedding picture
under the LOVE sign.
 
 
This little spooky girl is
darling for Halloween.
 
 
Linking up to:


Thursday, October 8, 2015

Orange Dresser

I'm in the mood for fall!
It is always fun to paint furniture
a seasonal color.
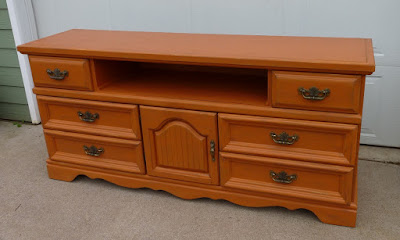
I'd like to share the dresser that
went from dark & drab to
bright & lively!


I did some major sanding on this 
project, and some modifications too.
There was one drawer slide and 
a pull knob missing.
That meant that I had to make
the large upper front space 
a usable shelf!
The two drawers inside the door 
area were long gone as well.
I used some thin wood that 
was laying around from another
dresser fix to whip out some handy
little shelves in that area too!


This paint was 9 years old,
from when we built our house!
It had never been opened,
so it was good as new.
The Menards brand Pittsburg paint called
Ginger Jar was just as pretty as when
I picked it out!


A lot of research online still left me clueless 
about the specifics of modifying a dresser drawer space.
So I got bold & borrowed the father-in-laws air nailer.
My hubby game me a few pointers and advice.
The biggest struggle was making some bracing in
spots to actually have some wood to nail into
and hold my shelf ends & corners in place.

Now, it can the void can hold cute baskets or 
be used as an entertainment center!!!

I envision this piece in a room with grey or ivory walls.
If someone was very bold, it could go with turquoise!


I did some dry brushing in brown 
and some minor distress sanding.

The finish turned out just as planned.


The wheat hardware was just right
for the rustic fall dresser.


I hope you like my latest
major project outcome!
It was not a project for the
weak of heart, but I'm thrilled
to give new life to yet another
sturdy old piece!
 
 
Linking up to:


Thursday, September 3, 2015

10 cent Frames

Every once in a while at a garage sale
I will spot an item with potential.
These old 5x7 frames made me smile.


Those curvy little edges & beaded trim were
screaming "PAINT and SAND".


Ivory paint over any dark surface 
can look divine when a light sanding
is done.  


I pulled out the old floral images
and found some book paper to frame.
The leaves were cut on my Big Shot
die cut machine with Tim Holtz brand
leaf dies.  The glitter paper gave this project
some serious sparkle!

Linking up to:


and


and

Tuesday, August 11, 2015

Teak Tray

I love quick little paint projects.
This teak tray I snatched up from the local
church garage sale looked inspiring.
For .75 cents I was willing to take 
on the challenge!


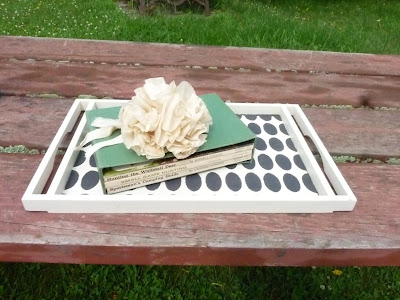
I gave it several coats of ivory paint.
Then using my Cricut machine,
I made an adhesive vinyl mask
to create that awesome oval pattern!


Isn't it so stylish?
I have great luck selling these type
of trays in my craft booth.
It's so fun to keep creating different
patterns.  The possibilities are endless on
my Cricut machine!!!


Thanks for stopping by my blog.
I know the posts have been less frequent.
I'm prepping my junk for two shows this fall.
After September, I should be able to blog
more consistently.

Linking up to:


Saturday, July 11, 2015

Coffee Pillows

I have mixed emotions about handmade pillows
I love them, especially vintage fabric and such.
But they don't sell in my craft booth.

It was a pleasure to sew some cute
 burlap throw pillows for my sisters birthday!


My sis had given me a few coffee sacks she bought
down in the city from her favorite coffee shop.

To get the project rolling,
I purchased some tan fabric & did a base layer 
 so the stuffing wouldn't show.


The print forced me to make them 
slightly upright in shape.
The sacks were a bit smaller than most,

I thought the burlap would be rough
and make an uncomfortable pillow.
They were pleasantly textured & 
so cute it didn't matter!
She loved them.

Linking up to: